Growing Your Sakura - From Seed To Sapling
Sakura (Cherry Blossom) Seeds Germination
A prior treatment with Scarification (weakening the hard outer shell) and Stratification (mimicking winter to encourage germination for certain types of seeds) is recommended for most Sakura (Cherry Blossom) seeds to achieve high germination rate.

*Orders will arrive from our greenhouse supplier in protected envelopes. Inside will be a sealed grey package containing your seed packs. The image below is an example of what a delivered order will look like*

Here are the steps for scarification:
In the following sections of our guide we refer to hydrogen peroxide to help weaken the outer shell as it also helps prevent mold, but there are other ways to scarify your seeds that make work better, and it is best to find the method that works best for you.
This process can be used for many types of seeds that "hibernate" in the winter so they can grow in the spring.
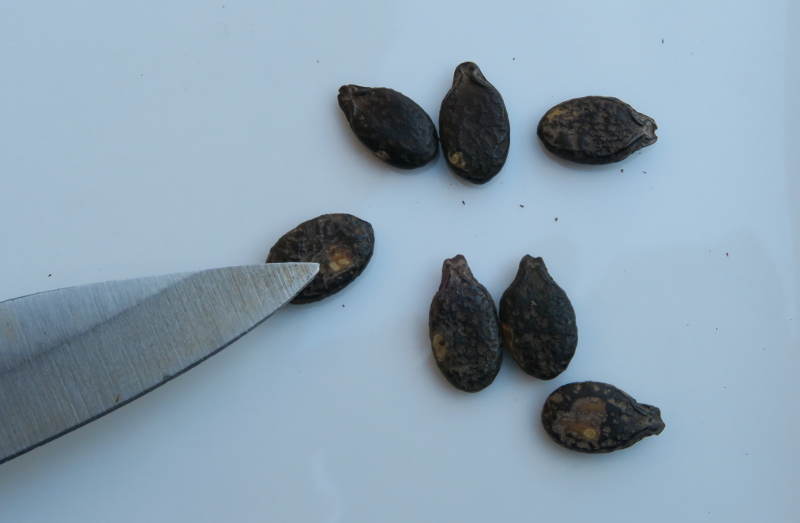
The Following Images Are Using Different Seeds, But The Same Process Applies To Many Seeds.
Our Methods are Listed From Easy-Difficult, Least Effective-Most Effective, Least Likely to Damage The Seed-Most Likely
Method 1: Soaking the seeds in Hydrogen peroxide for about 10 min.
(we strongly not only doing Method 1. This method can be helpful to reduce mold, but it is the weakest for of scarification)
Method 2: Using sandpaper to wear down the hard outer shell.

Method 3: Filing the hard outer shell, this is similar to the sandpaper, but can be more aggressive.

Method 4: Slightly nicking the seeds with a knife or something sharp.
Method 5: The most aggressive method is breaking open the hard outer shell with something like pliers. While this will fully expose the seed, be careful not to damage the inner seed.
Here are the steps for stratification:
Preparation for Stratification:
- Zip loc bag
- Some moist kitchen paper
- Plant labels
- 10% Hydrogen peroxide solution(common bleach) *optional but recommended
- Sieve
- A pair of gardening gloves
- A pair of Tweezers
- Most importantly, Sakura Seeds (you can get yours in our garden section)
Steps for Stratification:
- Rinse the Sakura (Cherry Blossom) seeds gently in a sieve.
- Use a gardening gloves and soak the Sakura (Cherry Blossom) seeds into the 10% hydrogen peroxide solution for about 10 minutes.* This step is optional but it helps prevent possible molding drastically.Use one of the Scarification methods listed above to weaken the hard outer shell.
- Pick up the seeds with a pair of tweezers and put them into a moist kitchen paper, then put them into a zip loc bag. Finish by labeling them and then refrigerate them. (Do not put into a freezer. Let them stay in the lower part of a refrigerator - the part where you usually store vegetables or fruit will be fine.)
- Sprouting should start in 2-8 weeks, depending on the variety. Some variety takes up to months to start germination. Check for germination once a week and if necessary ,moisturize the kitchen paper to maintain humidity.
*If you prefer not to use stratification, start here:
Here are the steps for direct germination or transferring of seedlings after stratification:
Preparation:
- Potting mix. Basically, ask the nursery for a compost for compost designed for Rose should fits well. Preferably, add about 30% of coarse sand (or any sandy soil) to achieve better drainage).The compost should be slightly acidic and a bit sandy. To minimize possible molding problem, make sure the compost you bought is sterile (most commercial compost are). Preferably, buy a new pack instead of using an already opened one.
- Seed Tray.
- 10% Hydrogen peroxide solution(common bleach) *optional but recommended
- Gardening glove
- A pair of Tweezers
- Copper based fungicide
- Sieve
Steps:
-
Rinse the Sakura (Cherry Blossom) seeds gently in a sieve.
2. Use a gardening glove and soak the Sakura (Cherry Blossom) seeds into the 10% hydrogen peroxide solution for about 10 minutes.* This step is optional but it helps prevent possible molding drastically. Use one of the Scarification methods listed above to weaken the hard outer shell. - Pick up the seeds with a pair of Tweezers. Sow your seeds on to the top layers of your growing medium in your pot or in seed trays. Cover the seeds with a thin layer of soil - not more than 2 cm.
*If you have already treat the seeds with stratification, starts here: transfer the seedlings with a pair of tweezers and plant them into the soil. - Light can enhance germination. Try putting the seed tray or pot under sunlight as much as possible.
- Maintain a medium level of humidity for the germination by regular watering.
- Germination of this type of seed can vary widely and naturally occurs in a few weeks- several months.
- (Optional but recommended)Once germinate, or after transferring seedlings from stratification, use a Copper based fungicide to prevent molding problems. Follow instruction on the fungicide label for amount and frequency of application.
We would like to include a short video as well of someone's experience growing Sakura seeds through this process. They have used moss, which is also a great way to grow them.